Using multiple workspaces
Any add-ons you purchase are distributed at the workspace level, meaning that they only apply to agents in the workspace where they were purchased. This means you can use multiple workspaces within a single account, then subscribe to different plans and add-ons for each one. To add a new workspace:There is no limit to the number of workspaces you can create on one account.
Manage your agents
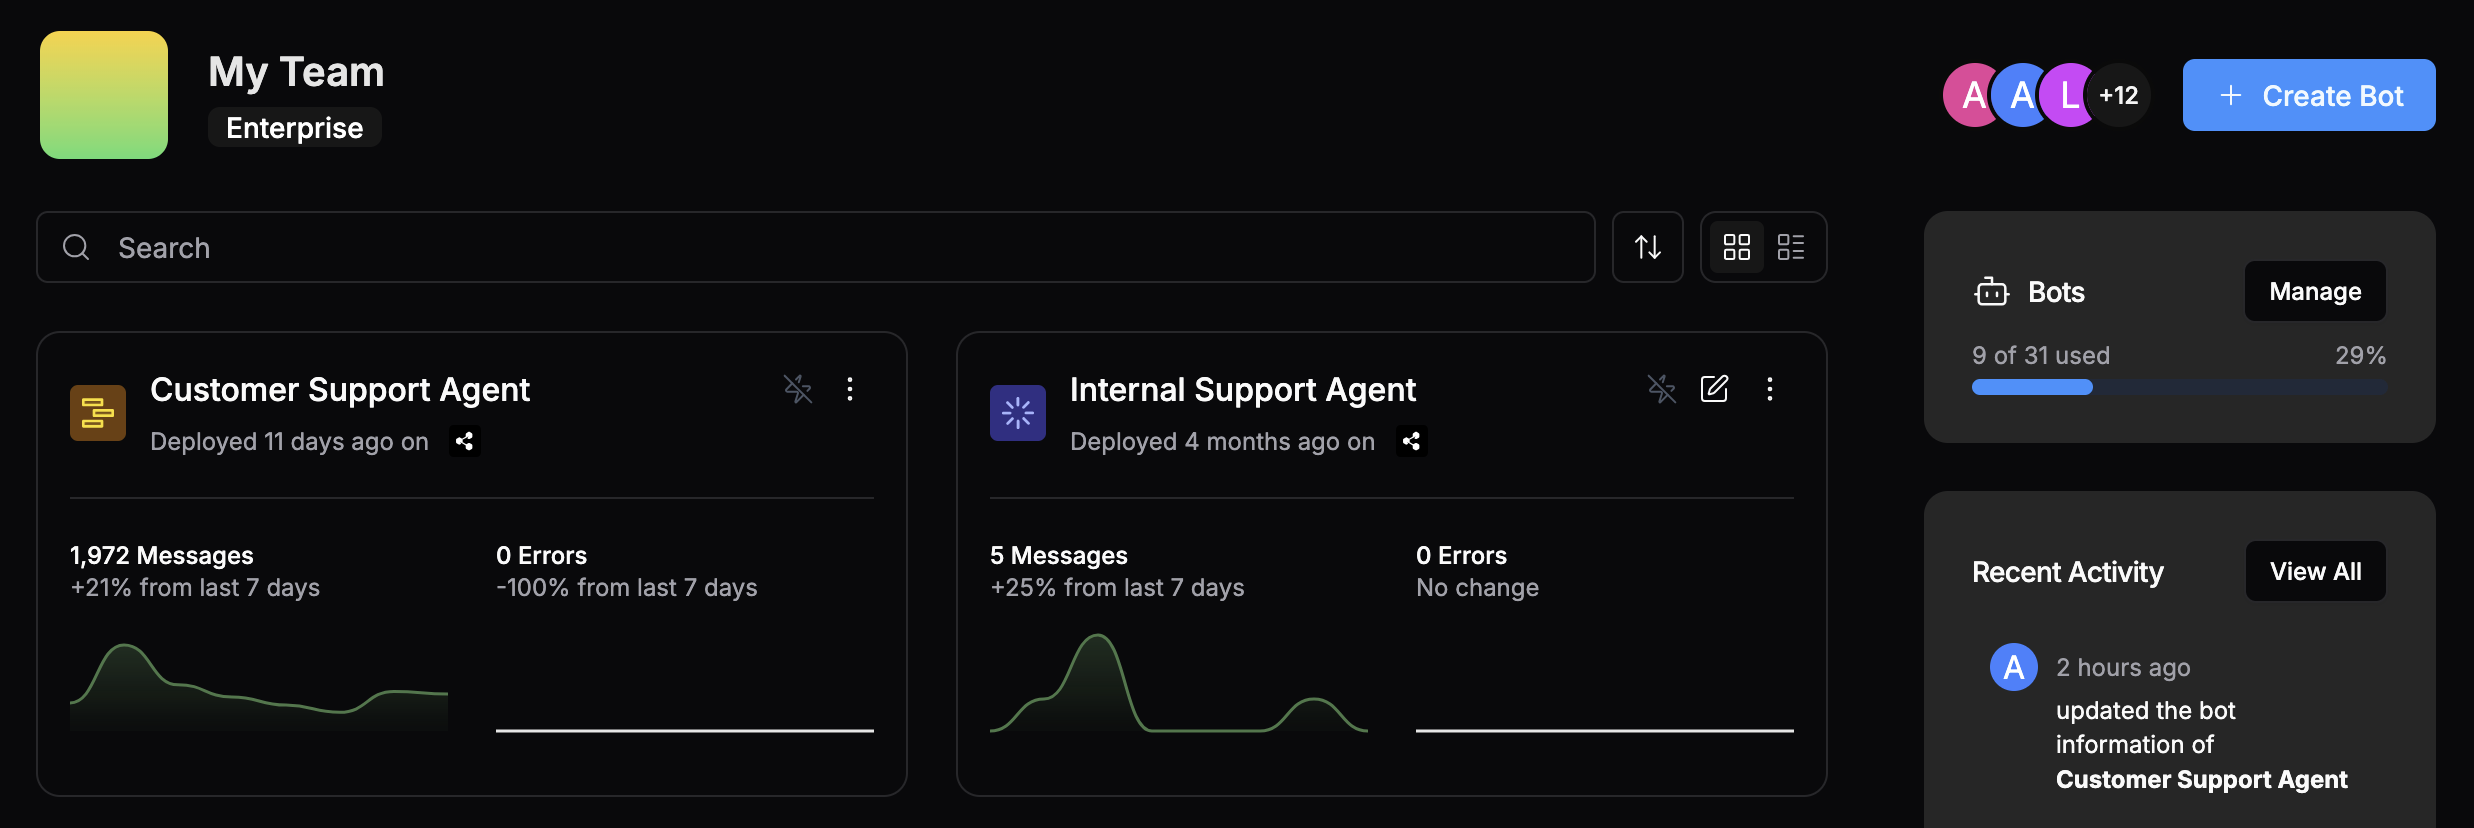
You can manage all your agents in your workspace’s Home menu: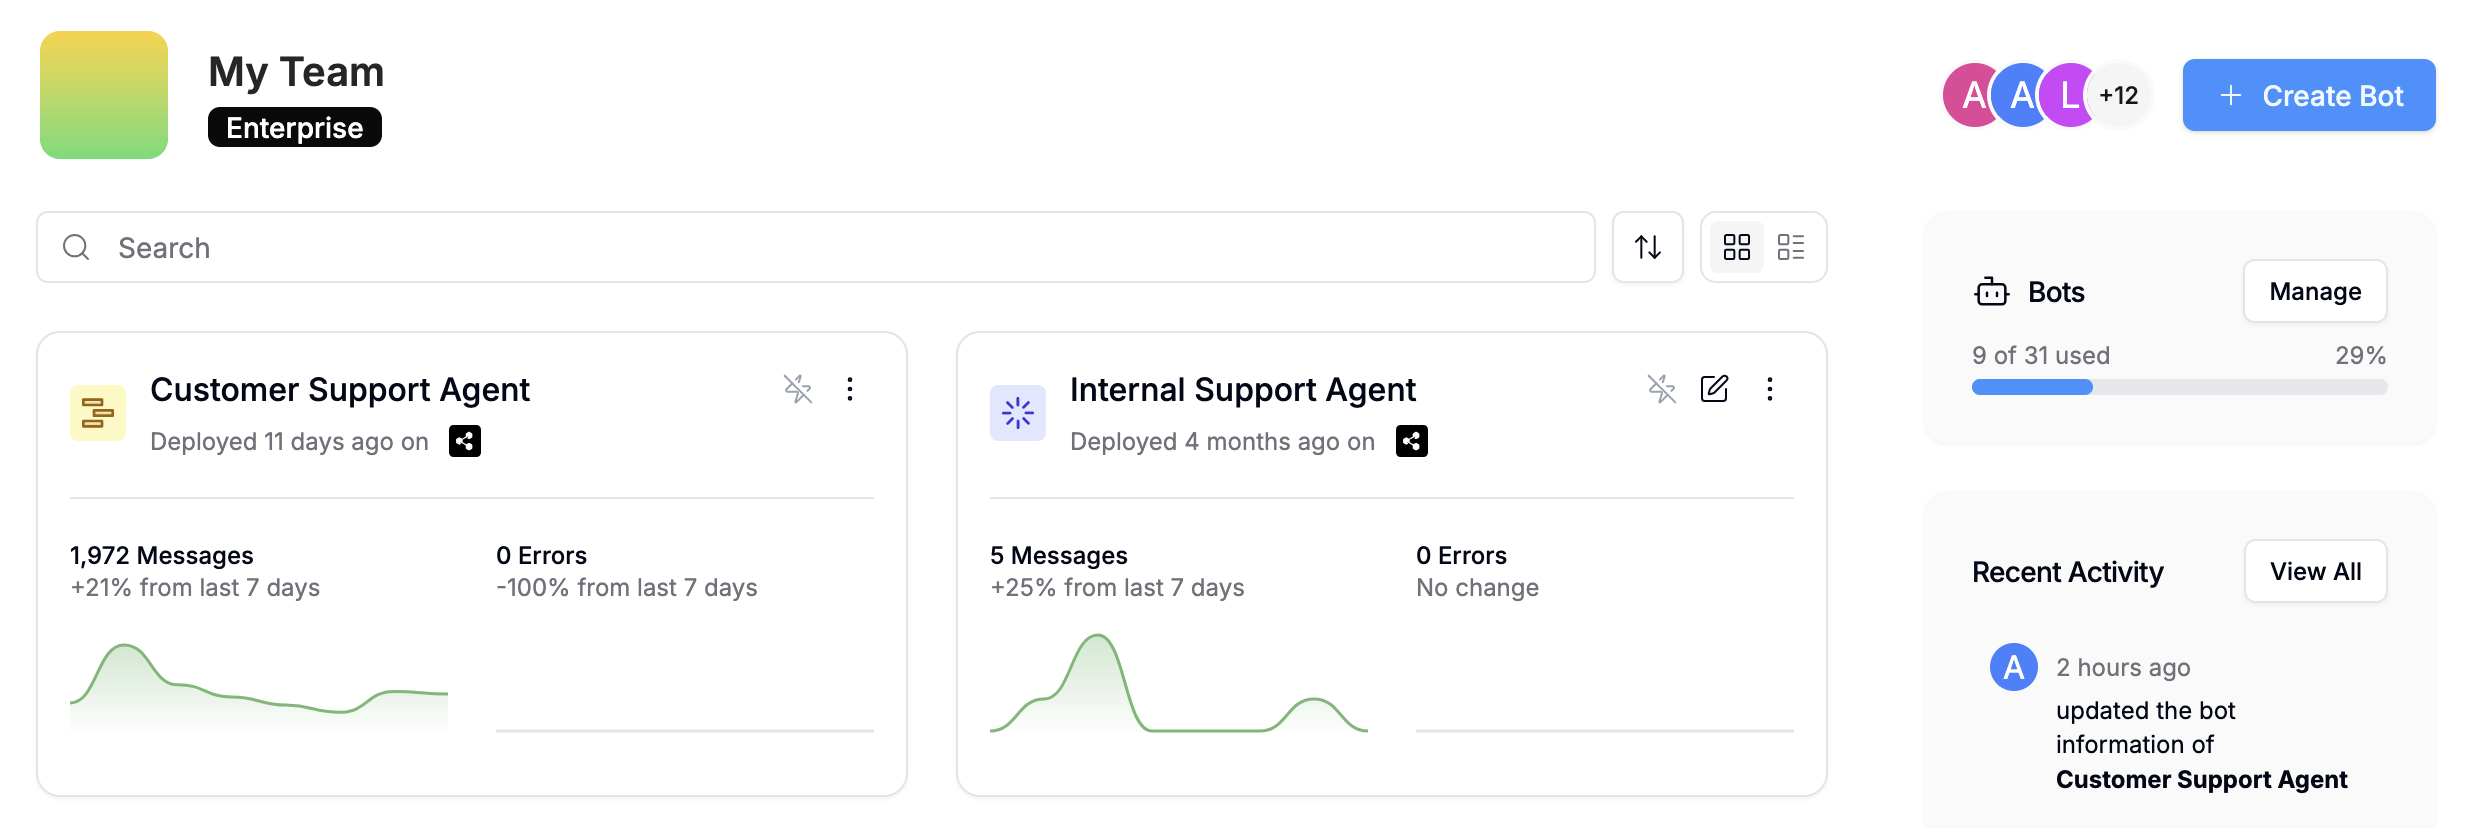
Create a new agent
You can create a new agent at any time by selecting + Create Bot in the upper-right corner.Rename an agent
To rename an existing agent, select then Rename.Enable Always Alive
You can enable Always Alive on any agent to keep it running continuously, even when no conversation is active. This allows for quicker response times when users first begin a conversation.The number of agents you can enable Always Alive for depends on your plan.
Copy an existing agent
You can copy an existing agent’s configuration (including all settings and Workflows) for any other agent:Delete an agent
To delete an agent, select then Delete.View deployed integrations
You can manage any integrations you’ve built and deployed to your workspace in the Integrations menu.If you just want to install third-party integrations, you can ignore this menu—instead, check out the official integrations documentation.
SDK
Software development kit for building and deploying integrations on Botpress.
Track usage quotas
You can track information about usage across your workspace in the Usage menu.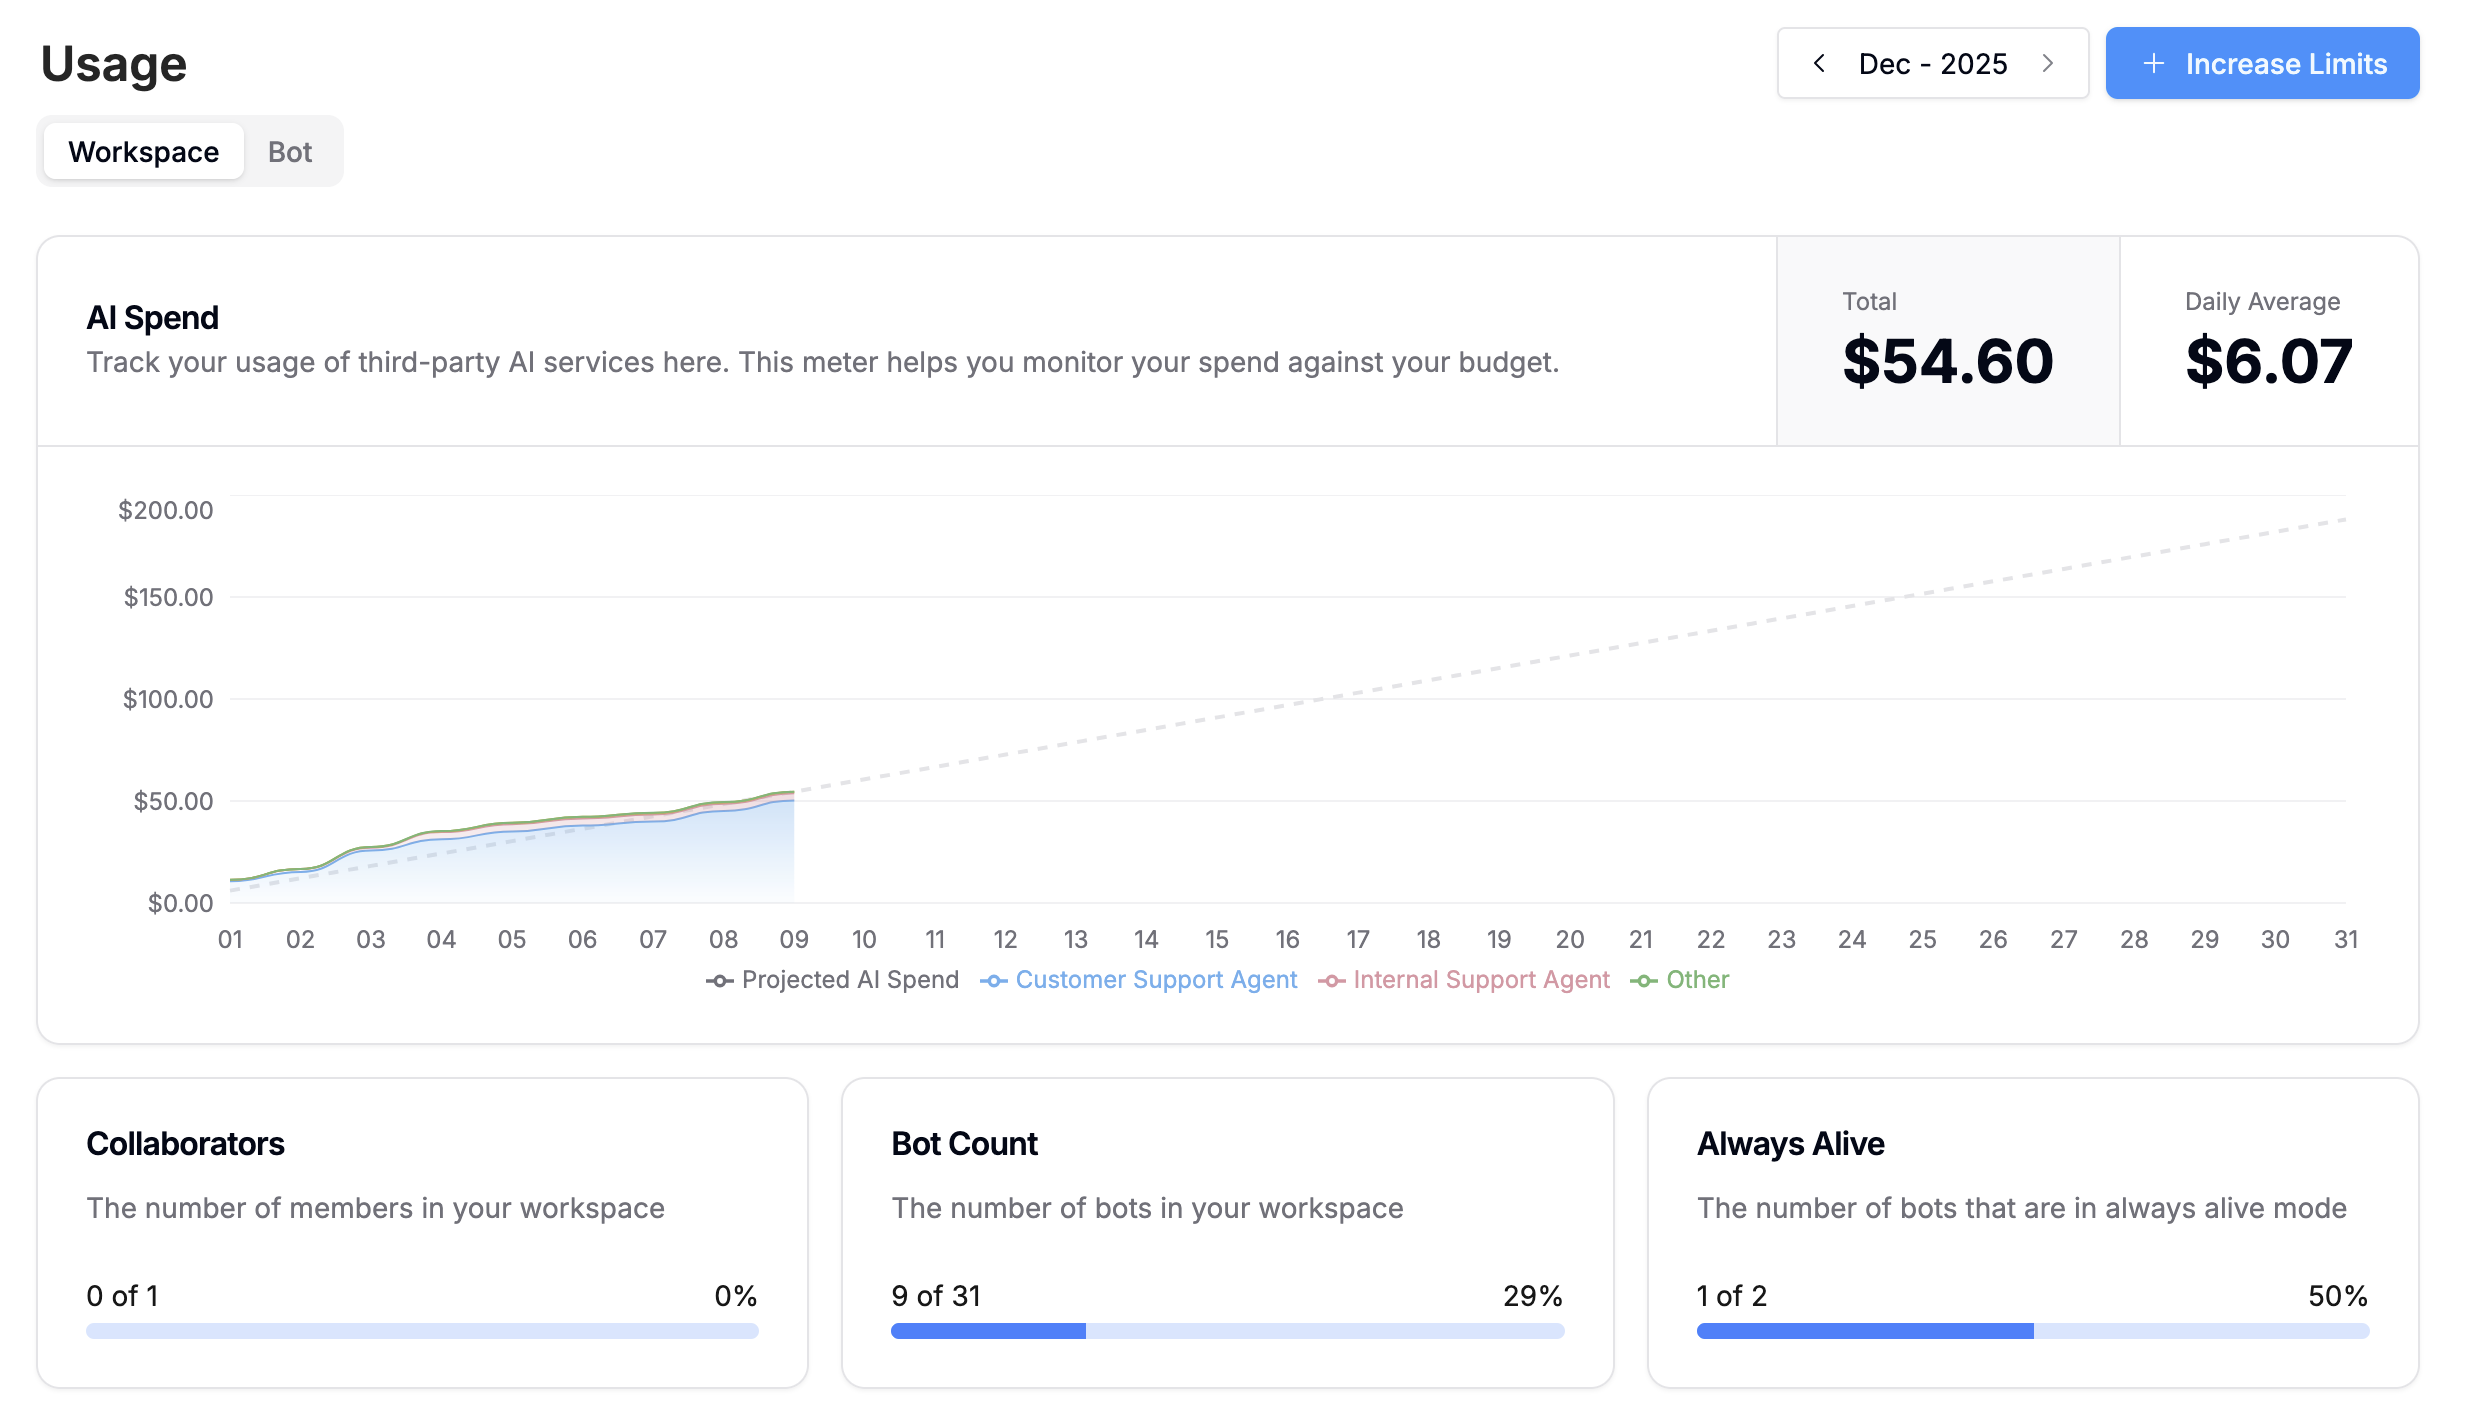
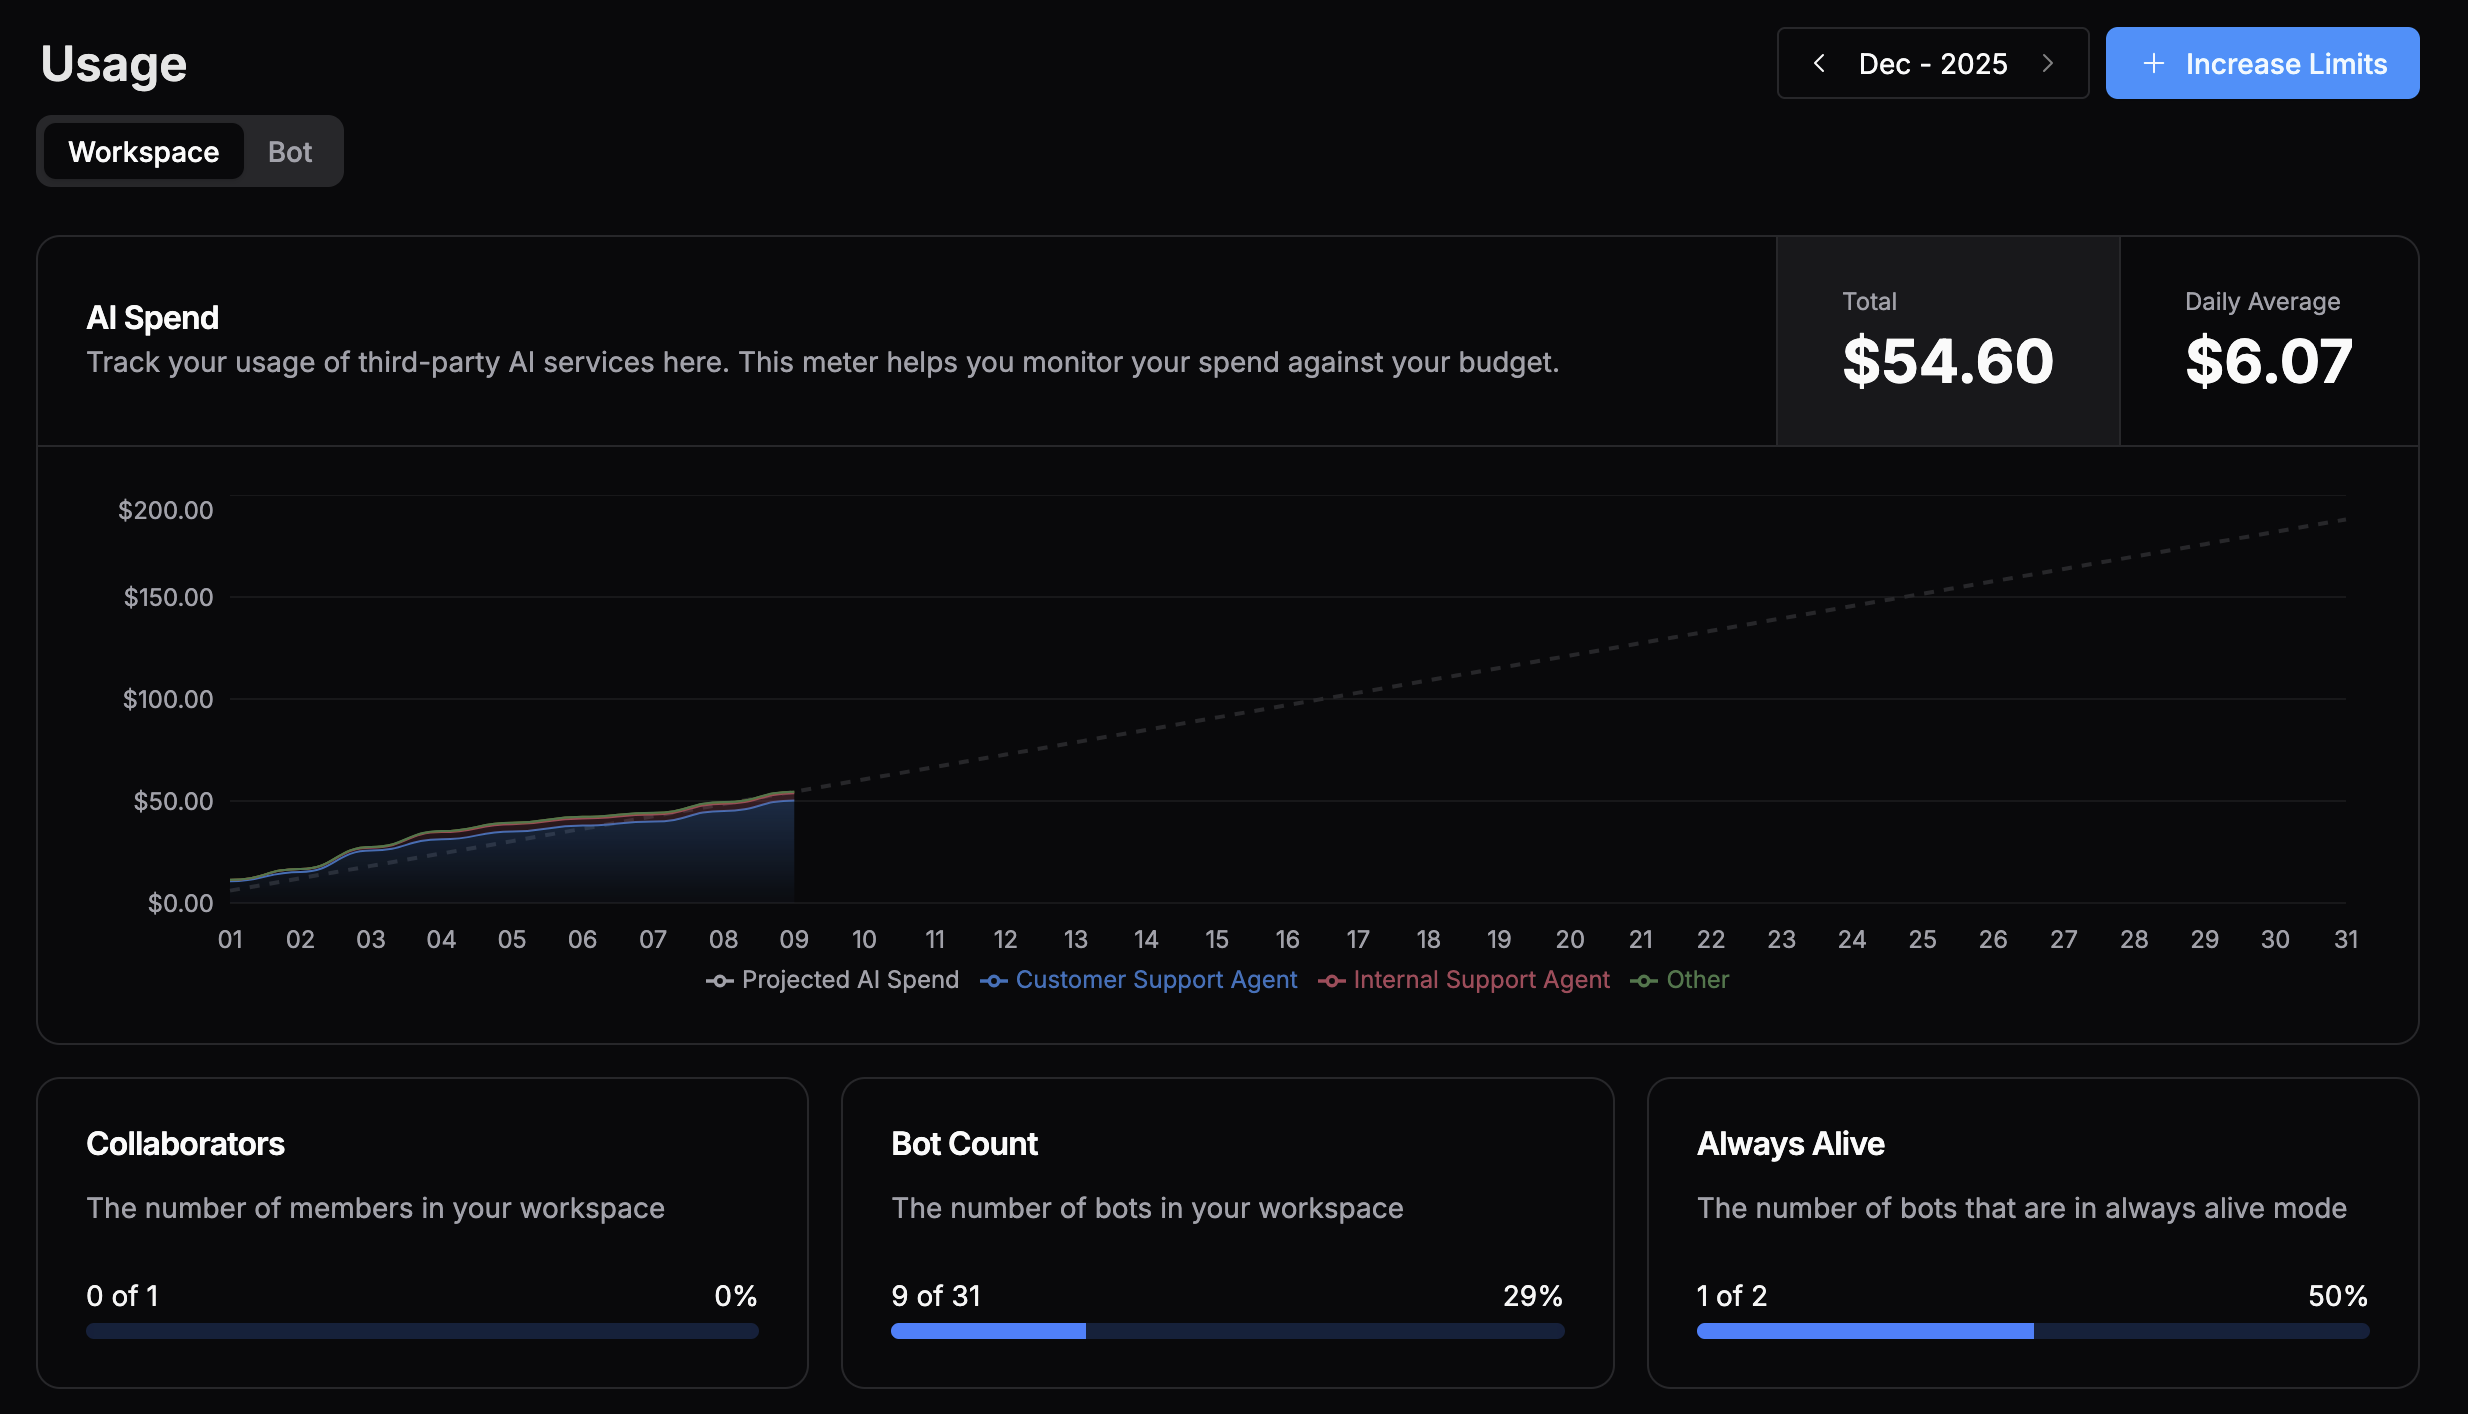
You can always increase any limits in the Billing menu.
AI Spend
Your AI Spend quota is the budget you allocate for your agent’s usage of LLMs. This includes:- Generating text
- Retrieving answers from Knowledge Bases
- Any other AI-powered actions
File Storage
Your File Storage quota determines the storage in megabytes (MB) available across your workspace. Files included in this storage include photos, videos, and audio files that you’ve uploaded to be sent by your agent.Table Rows
Your Table Rows quota determines the total number of rows you can add to your agent’s Tables.Vector DB Storage
Your Vector DB Storage quota determines the maximum storage available for Knowledge Base documents. It accounts for the total number of vectors in all of your Knowledge Base documents, as well as searchable columns in your tables. This value is expressed in MB for convenience, but the actual billing unit is a measure of vectorized storage, used for performing Retrieval Augmented Generation (RAG) on your Knowledge Bases.Incoming Messages & Events
Your Incoming Messages & Events quota determines the number of times your agent has been invoked in any channel and the maximum amount of times it can be invoked before it will stop responding. This includes:Collaborators
Your Collaborators quota determines the maximum amount of users that can collaborate in this Workspace.Bot Count
Your Bot Count quota determines the maximum number of bots this Workspace can hold. Once you reach the maximum number, you can purchase additional slots, or delete any unused bots to make room for new ones.Always Alive
Your Always Alive quota indicates how many remaining bots you can allocate the Always Alive status to.What's Always Alive?
What's Always Alive?
Botpress agents are powered by remote, virtual compute instances. Every time your agent begins a new conversation, Botpress spins up a new instance for that agent. This is known as a cold start.During a cold start, the system must:
- Allocate resources
- Initialize the environment
- Load necessary code
- Perform any required configuration before the agent is ready to handle requests or tasks.
Billing
You can update your billing preferences and manage your plan in the Billing menu.Pricing
Learn more about pricing and plans.
Automatically purchase add-ons
If you often find yourself having to increase a specific quota, you can automatically increase it using Auto Recharge:
Now when your agent hits that specific quota, it’ll adjust your plan automatically instead of notifying you.
FAQs
I've changed my subscription but the changes don't seem to be reflected?
I've changed my subscription but the changes don't seem to be reflected?
Because subscriptions are active throughout an entire month (or billing cycle), changes made to your subscription will appear when the next billing cycle begins.
If I purchase a plan or subscription upgrade in the middle of the month, when will I get charged?
If I purchase a plan or subscription upgrade in the middle of the month, when will I get charged?
Upgrades to your subscription are immediately pro-rated. If you purchase a Team plan in the middle of the month, you will pay half the value of the Team plan (for the remainder of that month), and then you will be billed as normal starting the 1st of the following month.
Where can I find Botpress invoices?
Where can I find Botpress invoices?
You can access invoices by selecting Invoice History in the Billing menu.
Where can I add my Tax ID?
Where can I add my Tax ID?
You can find, edit, or update your Tax ID by selecting Billing Information in the Billing menu.
Where can I change which email receives receipts and invoices?
Where can I change which email receives receipts and invoices?
You can adjust billing email preferences by selecting Billing Information in the Billing menu.
When does AI Spend get charged?
When does AI Spend get charged?
All usage-based billing, like AI Spend, is charged at the end of the billing period.
Can I make purchases on Botpress even though my payment has failed?
Can I make purchases on Botpress even though my payment has failed?
No, you can’t upgrade a plan or subscription if your payment fails.
When does Botpress send emails about an add-on quota that is nearing its limit?
When does Botpress send emails about an add-on quota that is nearing its limit?
Botpress sends email notifications to the owner of a Workspace when a quota has reached 75% (or more) of its usage threshold.
Manage roles
You can view and update roles for members of your workspace in Settings > Members. Here’s a breakdown of each role:| Role | Permissions |
|---|---|
| Viewer | Can only view bots and Workspaces. Can’t make any edits or changes |
| Billing manager | Can view and modify the Workspace’s billing information |
| Developer | Can create, view, and update bots in the Workspace. Can only delete bots they have created |
| Manager | Can create, view, and update bots in the Workspace. Can view audit records |
| Developer | Can add and remove Workspace collaborators, and manage all bots in the Workspace |
| Owner | The user who creates a Workspace is automatically its owner, and has the privileges of all roles |